
Summary
Configure the Case Xchange–Litify integration so your firm can refer cases out to other firms directly from Salesforce, and track each referral's status without leaving your CRM. This guide walks through the full sending-firm setup: choosing your send path, configuring Litify, mapping your fields, and syncing results back.
Before You Begin
These steps reflect the Case Xchange managed package v3.7. You'll need Firm Admin or Account Manager access in Case Xchange, plus Salesforce admin access. This configuration requires setup in both Case Xchange and Litify.
How the pieces fit together
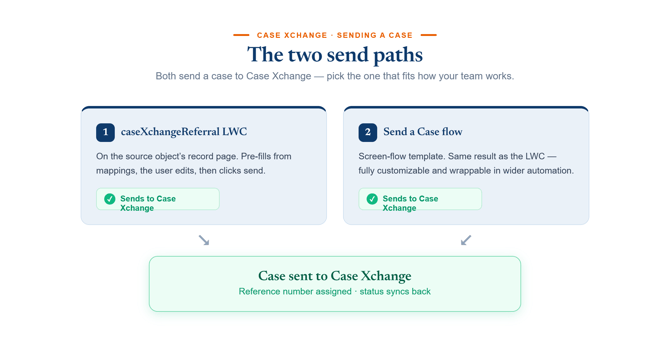
Determine the best sending path
The managed package includes two out-of-the-box sending paths. The LWC requires minimal lift — you map field assignments from the source object to the LWC fields and your team can begin referring. If your firm requires more customization, use the screen flow template to configure your own button for sending referrals.
Option A — caseXchangeReferral LWC
Choose this if your team should send from a record page with a pre-filled form. This is the standard path.
Example: A user opens an Intake, reviews the Case Xchange component already populated from your mappings, adjusts anything needed, and clicks send.
Option B — Case Xchange: Send a Case flow
Choose this if you want to customize the send experience or wrap sending into broader automation.
Example: A guided screen flow walks the user through jurisdiction and case type, recommends a firm from your routing rules, then collects case and client details before sending.
Plan your configuration
Decide the following before you build anything. These choices shape your mappings and your send experience.
- Source object — the object your team refers cases from (commonly Litify Intake or Matter). Required; it's where referral data is pulled from.
- Destination object — where Case Xchange writes results back. Optional, but required if you want to track status and receiving firm in Salesforce. Often the same object as the source.
- Send path — the LWC (Step 3) or the Send a Case screen flow (Step 4).
- Referral network — whether your team sends to your private network, the public directory, or uses routing rules to recommend a firm.
Begin setup in Litify
Step 1: Configure Objects/Fields
Confirm or create the fields let the integration match inbound referrals to the correct records in Salesforce/Litify.
Litify Bridge package or Previous Configuration. If the Bridge package is installed or you have already set up your firm to receive referrals, confirm these exist before creating duplicates. If you are not on the Bridge, create them as described below.
Fields To Keep In Mind:
- Referral link — on each object you'll map updates back from, add a lookup field linking the record to its originating CX Intake, or a text field that stores the CX Reference Number/ID. This is what lets a status or field update resolve back to the correct Case Xchange referral.
- CX Firm ID — on the Firm object, create a unique External ID text field that stores the originating firm's Case Xchange firm ID. When an inbound referral arrives, Salesforce uses this field to match it to the correct Firm record.
- CX Case Type ID (only if using the Litify Case Type object) — create a unique External ID text field that maps each Litify Case Type to its Case Xchange equivalent, so inbound referrals resolve to the correct case type.
Step 2: Add the "DO NOT SYNC" picklist value
- Go to the Litify Referral object → Field Sync Status picklist.
- Add the value
DO NOT SYNC.
A referral carrying this value will not sync to Litify's relationship management system (LRM).
Step 3: Build a before-save flow
Set sync status. When a referral is created with Case Exchange parameters, automatically set Field Sync Status to DO NOT SYNC.
Step 4: Enable Routing Rules (Only if routing rules are available to firm)
- From Setup quick find navigate to Custom Metadata Types
- Click "Manage Records" next to Case Xchange Integration Settings
- Set
Enable Routing RulestoTRUE
Design Sending Path
Configuring to send with the LWC
If you are using a the screen flow, continue to the next section.
Mappings tell the integration which Salesforce fields populate a referral, and where returned data lands. You can configure multiple mappings to account for referring the initial intake and for re-referring after a referral is rejected or withdrawn.
Complete the LWC Field mappings in the Case Xchange App
- From the App Launcher, open the Case Xchange app and go to the Case Xchange Admin v3 tab.
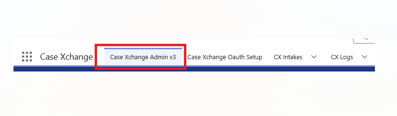
- Select Mappings in CX Field Mappings.

- Set your Source Object (required) — the object referrals are sent from.
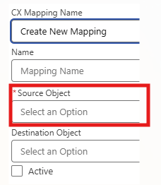
- Set your Destination Object (optional) — required if you want to track data coming back from Case Xchange.
- Map the fields required to construct a valid sent case, plus any optional fields your team wants pre-filled.
- You can build multiple mappings if you will be referring or re referring from different objects. (Example: Referring from the Intake vs. Re Referring from the referral)
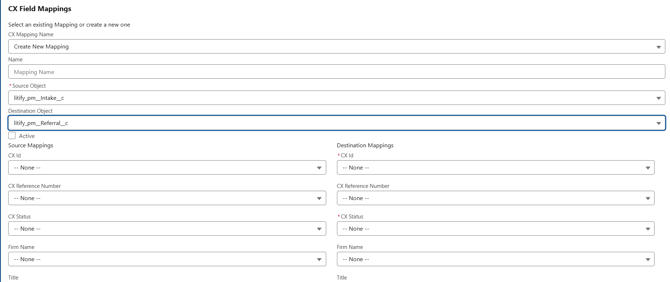
Fields required for every sent case
| Field | Mapping notes |
|---|---|
title |
Case title. |
caseType |
Case type code — use List Case Types for valid values. |
jurisdiction |
Jurisdiction code (e.g., NY) — use List Jurisdictions for valid values. |
clientFirstName |
Client first name. |
clientLastName |
Client last name. |
Important — lookup fields aren't supported. The integration only maps fields that live directly on the source object. If client data sits on a related record (for example, a Litify Client lookup), create formula fields on the source object that expose those values — first name, last name, full name — and map the formula fields instead. Most Litify orgs already have these in place for document generation.
Note — Litify Bridge package. If the Bridge is installed, a default mapping set is inserted on install, optimized for the standard Litify model. Review and edit those defaults rather than building from scratch.
Add the LWC to the page layouts
- Add the
caseXchangeReferralcomponent to the Lightning record page for your source object — and to every page layout it will be used on. - Confirm your Step 2 mappings populate the component correctly for a sample record.
- Begin referring.
What your team will see. Once a referral has been sent to Case Xchange, the LWC displays the referral's details from Case Xchange on the record. If a referral is rejected or withdrawn, the component gives your team the option to re-refer the case to another firm.
Configuring to send with the Screen flow
Design you flow using the existing template
- Clone the Case Xchange: Send a Case flow template.
- Customize the screens as needed, then add the flow to the relevant Lightning record page.
- Use assignments to map values and auto-populate variables on the screen.
Always clone before editing. Working on a copy keeps package upgrades from overwriting your customizations.
Send a Case: Flow Design
The rest of this step breaks down how the template is constructed — every element in order, what each screen collects, and how the branching logic works — so you can customize it confidently or rebuild it to match your firm's process.
1. Start Element
The start element begins by checking whether routing is available and loading the reference data the screens need for their choice fields.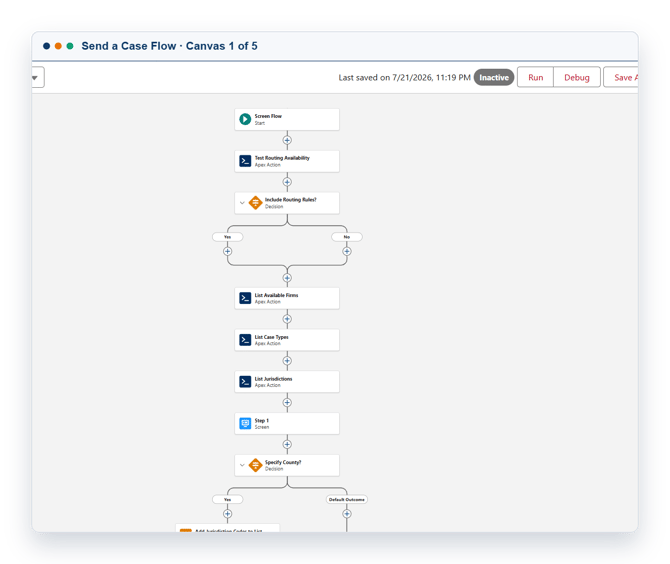
| Element | Type | Purpose |
|---|---|---|
| Start | Screen Flow | Flow entry point. |
| Test Routing Availability | Apex Action | Determines whether the firm has routing rules configured, which controls whether the routing option is offered on Step 1. |
| Include Routing Rules? | Decision | Yes / No. Both outcomes reconverge — this decision sets state rather than changing the path. |
| List Available Firms | Apex Action | Loads firms that can receive referrals, for the Receiving Firm and Selected Firm choice fields. |
| List Case Types | Apex Action | Loads valid case type values. |
| List Jurisdictions | Apex Action | Loads valid jurisdiction values. |
Why the list actions run first. Each one returns a collection that populates a choice field on a later screen. Running them up front means the screens render with valid values already loaded, rather than calling out mid-flow.
2. Collect routing criteria
2a. Step 1 screen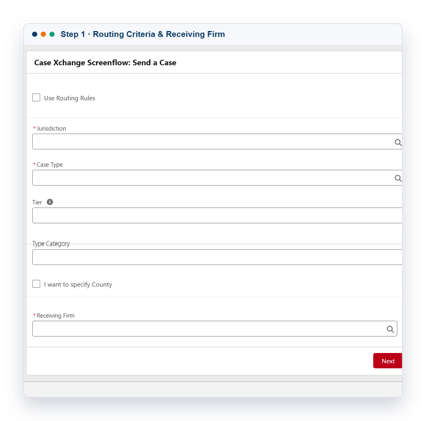
Label: Step 1 · API name: Step_1
| Component | Notes |
|---|---|
| Use Routing Rules | Checkbox. Conditionally visible — shown only when routing rules are available. Drives the Evaluate Routing Rule decision later. |
| Jurisdiction | Required. Choice field populated from List Jurisdictions. |
| Case Type | Required. Choice field populated from List Case Types. |
| Tier | Optional. Has a help tooltip. |
| Type Category | Optional sub-category of the case type. |
| I want to specify County | Checkbox. Drives the Specify County? decision. |
| Receiving Firm | Required. Choice field populated from List Available Firms. Conditionally visible — shown when the user is not using routing rules. |
2b. Optional county branch
The Specify County? decision checks the checkbox on Step 1 and takes one of two paths.
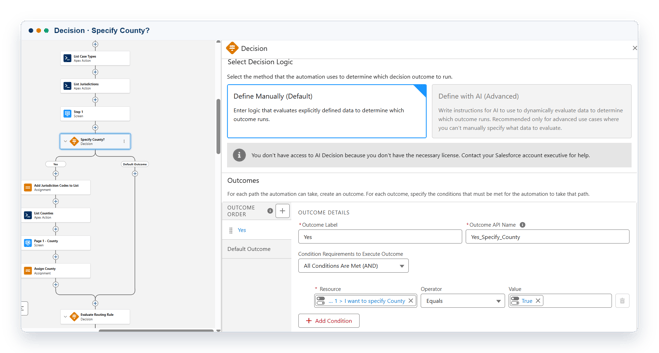
| Outcome | Condition | Path |
|---|---|---|
YesYes_Specify_County |
Step 1 > I want to specify County Equals True |
Runs the county sub-path below. |
| Default Outcome | — | Skips straight to Evaluate Routing Rule. |
2c. On the Yes path: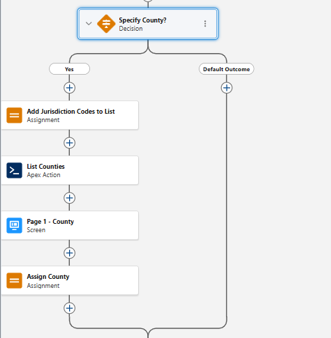
- Add Jurisdiction Codes to List (Assignment) — builds the jurisdiction code collection that List Counties expects as input.
- List Counties (Apex Action) — returns counties filtered to the selected jurisdiction.
- Page 1 - County (Screen, API name
Page_1_County) — a single required County choice field, with Previous and Next. - Assign County (Assignment) — stores the selection for the case payload.
2d. Both paths reconverge before the routing decision.
3. Determine the receiving firm based on Routing Rule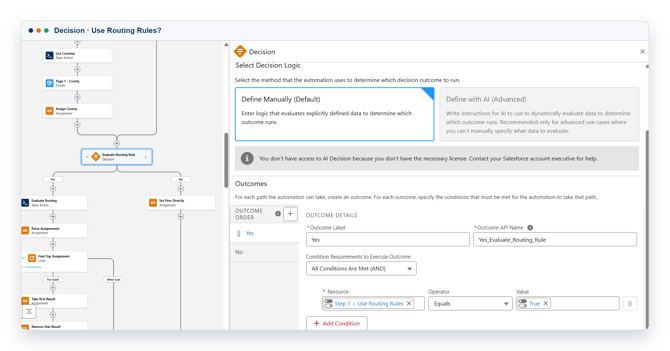
The Evaluate Routing Rule decision splits the flow into an automated routing path and a manual selection path.
| Outcome | Condition | Path |
|---|---|---|
YesYes_Evaluate_Routing_Rule |
Step 1 > Use Routing Rules Equals True |
Runs routing evaluation and firm confirmation. |
| No | — | Set Firm Directly (Assignment) — uses the Receiving Firm chosen on Step 1. |
3a. The routing path
- Evaluate Routing (Apex Action) — runs your routing rules against the criteria collected on Step 1 and returns matching firms in priority order.
- Parse Assignments (Assignment) — extracts the routing results into a working collection.
- Find Top Assignment (Loop) — iterates the collection to pull the highest-priority firm.
- For Each: Take first Result (Assignment) captures the current firm, then Remove that Result (Assignment) drops it from the collection so the next pass returns the next-best firm.
- After Last: continues to the confirmation screen.
- Confirm Routing (Screen) — presents the recommended firm for the user to accept or reject.
- Re-evaluate Routing? (Decision) — checks whether the user asked for a different firm.
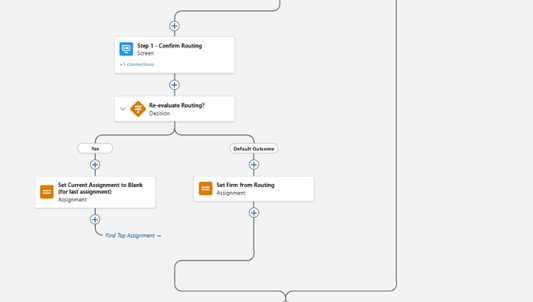
- Yes: Set Current Assignment to Blank (Assignment) clears the current pick and loops back to Find Top Assignment for the next firm.
- Default Outcome: Set Firm from Routing (Assignment) locks in the accepted firm.x
3b. Confirm Routing screen
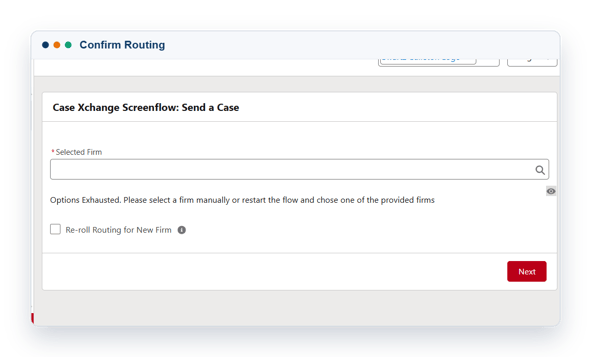
API name: Step_1_Confirm_Routing
| Component | Notes |
|---|---|
| Selected Firm | Required. Choice field showing the recommended firm; the user can override it. |
| Options exhausted message | Display text, conditionally visible: "Options Exhausted. Please select a firm manually or restart the flow and choose one of the provided firms." Appears when the routing collection has been fully consumed. |
| Re-roll Routing for New Firm | Checkbox with help tooltip. Selecting it sends the flow back through the loop for the next-best firm. |
How the re-roll works. The loop and the Re-evaluate Routing? decision form a cycle: each time the user rejects a recommendation, the flow removes that firm from the collection and returns for the next one. When the collection is exhausted, the Confirm Routing screen shows its fallback message asking the user to select a firm manually or restart.
4. Collect case details
Both firm-selection paths reconverge here, so every referral collects the same case and client data regardless of how the firm was chosen.
4a. Case Information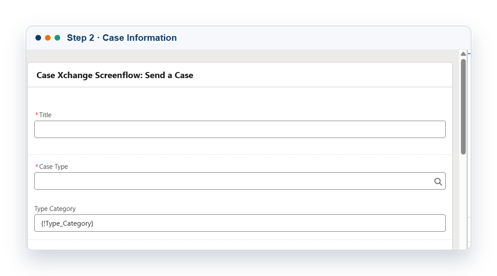
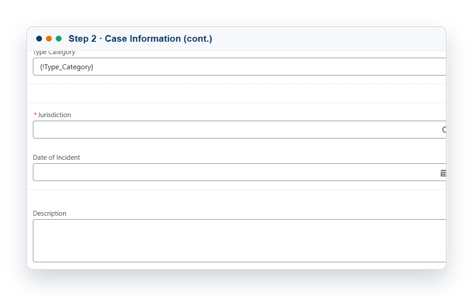
API name: Step_2_Case_Information
| Component | Notes |
|---|---|
| Title | Required. Case title. |
| Case Type | Required. Choice field. |
| Type Category | Pre-populated with {!Type_Category} carried forward from Step 1. |
| Jurisdiction | Required. Choice field. |
| Date of Incident | Date picker. |
| Description | Long text area. |
| Source | Text. How the client was acquired. |
Customization tip. Type Category demonstrates the pattern for pre-filling a field from an earlier screen — set the component's default value to the upstream variable. Use the same approach with assignments to auto-populate any field from your source record instead of asking the user to re-enter it.
3. Client Information
3a. Client information screen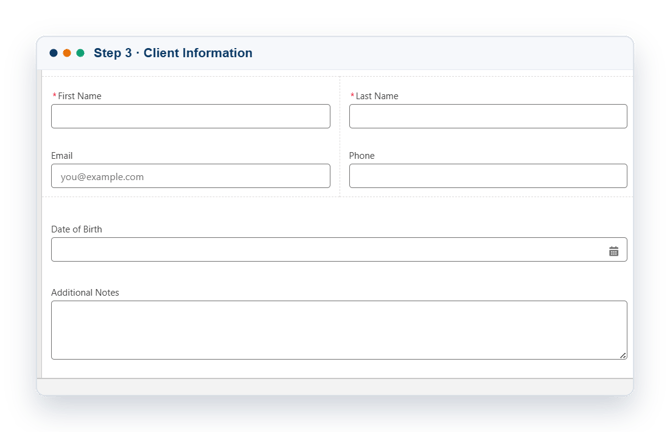
API name: Step_3_Client_Information
| Component | Notes |
|---|---|
| First Name | Required. Left column of a two-column section. |
| Last Name | Required. Right column. |
Left column. Placeholder text you@example.com. |
|
| Phone | Right column. |
| Date of Birth | Date picker. |
| Additional Notes | Long text area. |
5. Send and confirm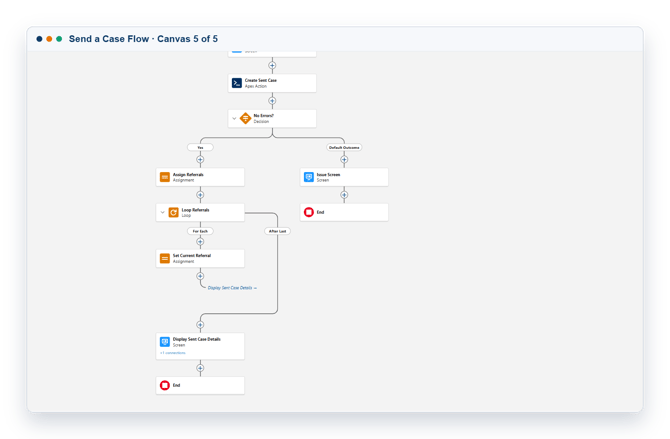
5a. Create Sent Case
(Apex Action) submits the referral to Case Xchange using the values collected across the screens. The No Errors? decision then routes to a success or failure screen.
| Outcome | Path |
|---|---|
| Yes | Assign Referrals (Assignment) → Loop Referrals (Loop) → Display Sent Case Details (Screen) → End |
| Default Outcome | Issue Screen (Screen) → End |
5b. On the success path
Loop Referrals iterates the referrals returned on the created case; Set Current Referral (Assignment) captures the one to display, so the confirmation screen can name the receiving firm and link directly to that referral.
6. Display Sent Case Details screen (If no errors - Errors will proceed to 7)
6a. Case Details Screen
API name: Display_Sent_Case_Details
Display text using merge fields from the action output:
| Content | Merge fields used |
|---|---|
| Confirmation line naming the reference number and receiving firm | {!Create_Sent_Case.caseDetail.referenceNumber}, {!CurrentReferral.referentFirmName} |
| Link to the referral in Case Xchange | {!CurrentReferral.id} |
| Link to the full case in Case Xchange | {!Create_Sent_Case.caseDetail.id} |
7. Issue Screen
7a. Relay received error
API name: IssueScreen
Displays an error notice followed by {!Create_Sent_Case.error}, so the user sees the message returned by Case Xchange rather than a generic failure. Single Finish button.
Customization guidance
- Pre-fill from the source record. Add assignments before the screens to populate fields from the Intake or Matter the user launched from, so your team confirms values instead of typing them.
- Trim screens you don't need. If your firm always uses routing rules, you can remove the manual Receiving Firm field and the Set Firm Directly branch. If you never use routing, remove the entire routing path and keep manual selection.
- Keep the error screen. Surfacing
Create_Sent_Case.erroris what makes failed sends diagnosable. Replacing it with a generic message will cost you support time. - Preserve the reconvergence points. The county branch and the firm-selection branches both rejoin the main path. If you add elements, make sure both sides still reconverge or one path will skip the case-detail screens.
- Re Referring Cases: Use the Re Refer Case Screen flow template to launch a re-refer flow.
Configure Sync Back In Case Xchange
Sync back is how referral progress returns to Salesforce after a case is sent. Complete this step if you mapped a destination object.
- In Case Xchange, go to Settings → Integrations and click Manage next to the Salesforce integration.
- Toggle Enable Sync On
- Define the Sync Strategy as "Upsert by External ID"
- Set the Salesforce Object API Name to the Object status updates will write back to. Under the Salesforce org connection:Once the Object Name is set, a field above that will appear to set the External ID Field Name. This is the field holding the Case Xchange Record ID.
- Select the Salesforce Status Field API Name where status updates will write back to.
- Map each Case Xchange Status to the corresponding Salesforce status. Complete the Case Status Mapping
- Enable Sync status from Salesforce
- Click Sync Statuses
This status mapping will only impact referrals you send.
Optional Step: You can map Case Status between Case Xchange and Salesforce if you do not want to pre assign them through the screenflow or LWC. This links the Case Xchange value to the record ID in salesforce.
Sync cadence: Sync back runs every 5 minutes and updates two fields only — status and receiving firm name. The interval is global and cannot be shortened for an individual firm. Teams routinely report the integration as "broken" when the window simply hasn't elapsed yet.
Case Xchange action input reference referenced in this resource
All actions appear in Flow Builder under the Case Xchange category. Every action returns an isSuccess (or success) Boolean and an error containing a machine-readable code and a human-readable message — always check it before using output values.
Create Sent Case (CaseXchange)
Creates a new case in Case Xchange. If referentFirmId is provided, the case sends immediately to that firm; otherwise it saves as a draft to be referred later.
|
Input variable |
Mapping notes |
|---|---|
|
|
Required. Case title. |
|
|
Required. Case type code — use List Case Types. |
|
|
Required. Jurisdiction code (e.g., NY) — use List Jurisdictions. |
|
|
Required. Client first name. |
|
|
Required. Client last name. |
|
|
If provided, sends immediately to this firm. |
|
|
County name — use List Counties. |
|
|
Client email address. |
|
|
Client phone number. |
|
|
Format: YYYY-MM-DD. |
|
|
Format: YYYY-MM-DD. |
|
|
Additional notes. |
|
|
Boolean — whether the client has signed a retainer. |
|
|
Case tier. |
|
|
Hours before the referral offer expires. |
|
|
How the client was acquired. |
|
|
Salesforce record ID to associate with this case. |
|
|
API name of the associated Salesforce object. |
Outputs: isSuccess, caseDetail (CX_SentCaseDetail), error.
Get Sent Case (CaseXchange)
Retrieves full details for a sent case, including all referrals associated with it. Use this to refresh a Salesforce record with the latest Case Xchange state.
|
Input variable |
Mapping notes |
|---|---|
|
|
Required. Case Xchange case ID, reference number, or linked Salesforce record ID. |
Outputs: isSuccess, caseDetail (CX_SentCaseDetail), error.
Re-refer Sent Case (CaseXchange)
Sends or re-refers an existing case to a firm. Use after a referral has been rejected or withdrawn, or to redirect a draft case.
|
Input variable |
Mapping notes |
|---|---|
|
|
Required. Case Xchange case ID or reference number. |
|
|
Required. ID of the firm to refer to — use List Available Firms. |
|
|
Optional notes to include with the referral. |
Outputs: isSuccess, caseDetail (CX_SentCaseDetail), error.
Send Message (CaseXchange)
Sends a message on a referral or case, optionally including a requested status change.
|
Input variable |
Mapping notes |
|---|---|
|
|
Required. Case or referral identifier. |
|
|
Required. Message body text. |
|
|
Optional status to request alongside the message. |
Outputs: isSuccess, statusUpdate (CX_PublicStatusUpdateDto), error.
Get Available Statuses
Returns the current status and valid next transitions. For a sent case, pass isSent = true.
|
Input variable |
Mapping notes |
|---|---|
|
|
Required. Case Xchange ID of the case or referral. |
|
|
Required. |
Outputs: success, currentStatus, statuses (Text Collection), error.
Evaluate Routing (CaseXchange)
Evaluates your routing rules against a hypothetical case profile and returns which firms would match. Used by the Send a Case flow in Phase 3.
|
Input variable |
Mapping notes |
|---|---|
|
|
Required. Case type code. |
|
|
Required. Jurisdiction code. |
|
|
Case tier. |
|
|
County name. |
|
|
Sub-category of the case type. |
|
|
Routing attempt number (for round-robin or fallback logic). |
Outputs: isSuccess, result (CX_RoutingEvaluationResult), error.
Evaluate Re-Referral (CaseXchange)
Evaluates routing for an existing case to determine which firm should receive the re-referral.
|
Input variable |
Mapping notes |
|---|---|
|
|
Required. Case Xchange case ID, reference number, or Salesforce record ID. |
|
|
Override the tier for routing evaluation. |
Outputs: isSuccess, result (CX_RoutingEvaluationResult), error.
List Available Firms (CaseXchange)
Returns firms that can receive referrals, with pagination and search. Use the returned firm IDs with Create Sent Case or Re-refer Sent Case.
|
Input variable |
Mapping notes |
|---|---|
|
|
|
|
|
Search term to filter firms by name. |
|
|
Page number (default: 1). |
|
|
Number of results per page. |
Outputs: isSuccess, items (CX_AvailableFirm Collection), page, pageLimit, total, totalPages, error.
Reference list actions
Use these to populate choice fields for the inputs on other actions. The Send a Case flow calls all three in Phase 1.
|
Action |
Mapping notes |
|---|---|
|
List Jurisdictions (CaseXchange) |
No inputs. Returns all US states and territories. Outputs: |
|
List Case Types (CaseXchange) |
No inputs. Returns all active case types. Outputs: |
|
List Counties (CaseXchange) |
Optional input |
Other included flow templates
The package installs flow templates as drafts. Clone and customize them before use. All appear under the Case Xchange category in Flow Builder. The Send a Case template is documented in full in Step 4 above.
Case Xchange: Get Sent Case Info
Autolaunched flow — retrieves complete information about a sent case, including the most recent referral.
-
Accepts a
caseIdas input. -
Calls Get Sent Case to fetch full case details.
-
Iterates through all referrals on the case to identify the most recent one.
-
Returns the full case detail object and a summary of the most recent referral.
Input: caseId (Text) — Case Xchange case ID, reference number, or linked Salesforce record ID.
When to use: call from another flow or process to display or act on a sent case's current state. This is the recommended way to refresh a Salesforce record with data beyond the two fields the auto-sync covers.
Case Xchange: Re-Refer Referral
Screen flow — withdraws a current referral and re-sends the case to a different firm.
-
Retrieves current case details and checks which status transitions are available.
-
Determines whether the case can be re-referred:
-
Draft, rejected, or withdrawn — proceeds directly to firm selection.
-
Active referral that can be withdrawn — prompts the user to confirm withdrawal first.
-
Other statuses — displays a message explaining the case cannot currently be re-referred.
-
-
If routing rules are configured, evaluates re-referral routing and recommends the next best firm.
-
Lets the user accept the recommendation or search for a firm manually.
-
Calls Re-refer Sent Case to send to the selected firm.
-
Displays a success or error message.
When to use: add to a case detail page so users can redirect a referral when the receiving firm declines, goes unresponsive, or the case needs reassignment.