
Overview
-
The Case Status integration connects Case Xchange with the Case Status client communication platform, allowing firms to keep referral partners updated as cases progress.
-
Firms can map Case Status case stages to Case Xchange statuses so updates sync automatically between systems.
-
The integration helps reduce manual updates and keep referral partners informed when cases move through key stages.
-
Cases can be linked automatically or manually, depending on your firm’s configuration and workflow.
-
Proper status mapping ensures that partners receive accurate updates on referred cases throughout the case lifecycle.
Prerequisites
- Firm must be an active Case Status customer
- Necessary permissions to manage integrations in Case Xchange [Firm Administrator; Account Manager]
- Your firm must have access to the Case Status Integration in Case Xchange. [If missing, you can request access from our team]
- Case Status API Key [Must be provided by Case Status]
Request API Key Case Status
Reach out to your Case Status point of contact and request your API key. Only once this is received can you proceed with configuration.
Installation & Setup
Open Integrations
- Log in to Case Xchange ➡️ Open Settings
- Click on the Integrations Tab

- “Manage” next to Case Status

Configure Case Status Integration
Connect Case Xchange with Case Status
-
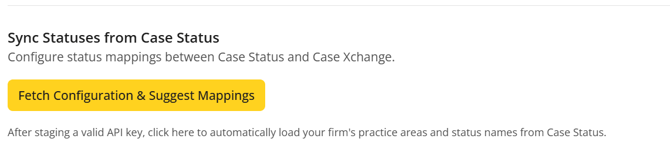
From that page click “Configure Key,” in the pop-out enter the key provided in Step 1 and then click “Stage API Key” as shown below
-
Once staged click 'Fetch Configuration & Suggest Mappings' to ensure the connection was made.
-
-
If this results in an error, try updating the key to ensure it is correct.
-
Optional Step: Enable Sync Case Status IDs
Automatically link cases to Case Status when they move to the Signed, In Litigation, or Investigating statuses. This setting is disabled by default. Before enabling it, confirm with your team that automatic linking aligns with your firm’s workflow. When this setting is disabled, cases must be linked manually or through the Bulk Updates tool.
Reasons you may not want automatic syncing:
-
Separate intake and matter cases: Some firms create separate Case Status records for the intake stage and the active matter. In these situations, you may prefer to link the appropriate case manually once the matter is created.
-
Manual review before rejecting cases: Your team may want to manually review cases before rejecting them to ensure feedback is provided to the referring partner.
Mapping Case Exchange Stages to the Case Xchange Statuses
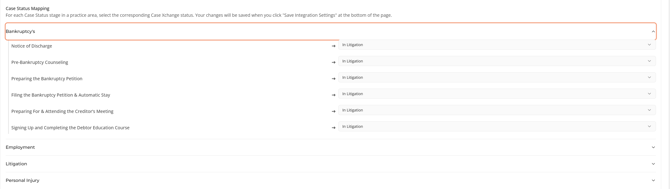
- After the configurations are fetched, all practice areas configured in Case Status will appear in the list.

- Select a practice area and click the dropdown to expand the list of available Case Status stages.
- The Case Status stages are on the left listed in alphabetical order with the Case Xchange statuses being on drop-downs in the right listed in process order.
- The Case Status stages are on the left listed in alphabetical order with the Case Xchange statuses being on drop-downs in the right listed in process order.
- For each Case Status Stage select a corresponding Case Exchange Status it should align with.

- After practice areas and stages have been mapped, click "Save Case Status Setting."

Don't forget to save your update will result in losing the changes.
❓ What if not Case Xchange does not have the same status options as Case Status?
Many Case Status stages may correspond to a singular Case Xchange status and vice versa. You may also not have an appropriate Case Status stage for every Case Xchange status, neither are an issue, but we recommend mapping at least one Case Status stage for each of the following Case Xchange statuses to ensure your partners are kept informed:
-
Signed
-
In Litigation
-
Closing
Learn more about Case Xchange Status's here: Case Xchange Status Explanations
Linking Cases to Case Status
If you do not have automatic syncing enabled you will need to link individual cases to Case Status. This can be done manually on an individualal case or with the bulk update tool.
Linking an individual cases to Case Status
-
In Case Xchange open the case record that you would like to link.
-
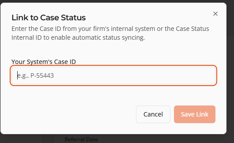
Click the “Link to Case Status” button shown at the top of the Case detail page.
-
If you do not see this button then the Case Status integration has not been set up, has been set up incorrectly, or was not saved correctly after configuring.

-
- In the window that appears, enter in the Case Status “Case ID” and click “Save Link”
- If the linking was successful, a success banner will appear in the top right and the case will begin getting it’s status updated from Case Status.
- If there were any issues a similar red banner will appear noting that the case was not linked. Please double check the ID against the information in Case Status to ensure it’s correct.
Linking multiple cases with the bulk Updates Tool
-
Using the Bulk Updates tool in Case Exchange export your existing cases.
- Update each case on the exported CSV with the Case ID from Case Status & Save the document.
- Import the updated CSV.
Learn more about how to use the Bulk Import Tool here: Bulk Update Existing Cases
Additional Information
Checking if Cases are Linked
Utilizing the export received cases function in the import/export tab can give you an Excel report that will have Case Status IDs for linked cases. You can also review this directly with filters in Received Cases.
Checking if Partners use Case Status
As Case Status can be a valuable resource for tracking sent cases, any firm that uses Case Status will have a badge as shown below to signify that they are using then platform. Referring to these firms may result in more regular status updates.
Badge as shown in private or public directory
Badge as shown when attempting to refer to that specific firm