
Before You Begin
Before uploading documents, make sure you are logged in to Case Xchange and have opened the correct case.
Steps
- Log in to Case Xchange.
- Open the specific case where you want to upload the documents.
- Click the Documents tab.

- Select Upload New.
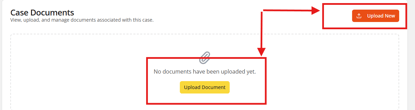
- Add the closing documents you want to upload.
- Wait for the upload to finish.
- Confirm the documents appear in the Documents section for the case.
Tips
- Verify that you are working in the correct case before uploading documents.
- Allow the upload to finish completely before leaving the page.
- Review the uploaded files to confirm the correct documents were added.
Troubleshooting
If your documents do not appear after uploading:
- Refresh the page and check the Documents tab again.
- Confirm you selected the correct case.
- Try uploading the files again if the upload did not complete successfully.
Result
Once the upload is complete, the closing documents will be stored in the case record and available from the Documents tab.